Metal Forming Knowledge Base
- Published Articles
- Steel Information
- Stamping & Formability Information
- All Downloadable Articles
- Did You Know?
Author: Daniel J. Schaeffler, Ph.D.
First published in the March 2018 issue of MetalForming Magazine.
Sheet mills produce steel grades to the requirements outlined in specifications. These typically are issued by the end user, national/international bodies such as ISO or ASTM, or industry organizations such as SAE or the Aluminum Association. These documents contain grade-by-grade requirements for tensile and ductility levels, flatness and width tolerances, and chemistry ranges.
Consider a grade you’ve probably heard of: AISI 1008/1010. The problem is, in spite of appearing on many part prints, it’s not really a steel grade. The American Iron and Steel Institute no longer publishes materials grade specifications—SAE International took over those efforts long ago. SAE J403, Chemical Compositions of SAE Carbon Steels, is the specification covering the naming convention and required chemistry of carbon steels.
SAE steel grades are described by a four-digit number—1008, 1050 or 4340, for example. The first two digits reflect the major alloying elements, such as 10XX for plain carbon steels with a maximum manganese content of 1 percent, or 43XX used for nickel-chromium-molybdenum steels. The last two digits indicate the nominal carbon content in hundredths of a percent. For example, the nominal carbon content of 1008 steel is 0.08 percent, 0.10 percent for 1010 steel and 0.40 percent for 4340 steel.
The steel grades designation indicates only the nominal carbon level, but acceptable ranges differ for each grade. SAE J403 grade 1008 allows for as much as 0.10-percent carbon with no minimum, which means a vacuum-degassed interstitial free steel with 30 ppm carbon (0.003 percent) is just as applicable as a steel with more than 30-times the carbon content and made without vacuum degassing. This difference alone can result in vastly different forming and welding performance within the same grade.
The SAE J403 grade-1010 specification states that steel may be supplied with carbon content from 0.08 to 0.13 percent. While this represents a tighter carbon range than grade 1008, and prevents the use of vacuum degassing, we don’t know much more. Due to the tolerances on carbon, it is possible that a 1010 steel (0.08 to 0.13-percent carbon) will contain less carbon than a 1008 steel (a maximum of 0.10-percent carbon).
What about strength and ductility? Unfortunately, specifications for grades 1008 and 1010 list no tensile requirements. We know that higher carbon content typically translates to higher strength and lower ductility. However, processing also plays a significant role in determining tensile properties.
Suppose that you order grade-1008 or grade-1010, where only chemistry limits are specified, but you also require flatness tolerances. A mill may have produced a coil that meets chemistry requirements, but with buckles or waves. Though correctable, processing to eliminate these defects involves bending and unbending over rolls, which increases strength and decreases elongation. Take two identical paper clips, then bend one of them back and forth to straighten it out. While both have the same chemistry, formability is reduced for the clip that was shape-corrected.
Since no tensile requirements are associated with grades 1008 or 1010, the mill almost certainly will ship you this re-rolled coil that meets the necessary flatness standards as long as the order requirements are satisfied. Not only may stamping performance differ, but the mill is not required to inform you of this change under most circumstances.
To ensure some consistency in tensile properties, you cannot order SAE J403 grade-1008 or grade-1010 steel. SAE J2329 is the low-carbon-sheet-steel specification with requirements for strength, elongation and n-value (see Table). In this spec., grade 1 represents the least restrictive steel (widest allowable properties) while grade 3 for hot-rolled or grade 5 for cold-rolled ensures shipment of the highest-formability steel.
SAE J2329 – Selected Chemistry & Mechanical Property Requirements for Cold Rolled and Hot Rolled Sheet Steel
(N/R = no requirement; refer to full specification for other requirements)

If your company has been working with the same supplier, maybe it knows what’s needed for each part or has a history of what has been shipped. When buying from various service centers, expect significant variation in the products received, even though the orders are the same.
If you experience high scrap costs, consider changing how you order your raw materials in order to better control what you receive.
If you enjoyed this article, be sure to read Part 1.
Author: Daniel J. Schaeffler, Ph.D.
First published in the December 2019 issue of MetalForming Magazine
We exercise customer choice daily, from the car we drive to the cell phone we use. Pretty much every vehicle can get you from Point A to Point B, and every phone can at least initiate a call. Price, features and quality primarily influence our decision to choose one product over another. Similar considerations are at play when a metal stamping company selects a sheet metal supplier.
Selection as a supplier requires availability of the right metal grade at the desired thickness and width. The lowest price helps, but not required. One example: Apple products provide sufficient value to their customer base, allowing Apple to compete in the marketplace on facets other than price.
Value-Adding Opportunities for Sheet Metal Suppliers
Manufacturing companies order sheet metal to ASTM or SAE specifications, or even to their own specs. Many specs feature wide tolerances and allowable ranges that enable the greatest number of potential suppliers. Purchasing preference may be given to those suppliers having invested in equipment and processes that result in better control of thickness, flatness and tensile property distributions. These tighter ranges enable greater throughput and reduced downtime in the part-manufacturing operation. Improved manufacturing efficiency can lead to greater press availability to tackle additional jobs. More consistent properties also may reduce the frequency of tooling and press maintenance. Opportunities like these have value to any manufacturing company, possibly to the extent that justifies paying more for incoming metal.
Another way for suppliers to show value: teach their customers how to make more efficient use of their products. To maximize the potential for a mutually beneficial outcome, the supplier must understand how and why the customer uses the selected product.
An example: The maximum-width coil that can be produced at a sheet mill is a function of the available equipment and the targeted grade and thickness. Commonly available maximum widths typically measure 36, 48, 60 or 72 in. For a given grade and thickness, an order of less than the maximum width capable of being produced results in lower mill productivity as measured in tons/hr.
In certain conditions, this can be exploited to everyone’s advantage. Take the example of a stamped product specified as needing a 31-in.-wide coil. A mill with a 36-in. maximum width capability can produce this coil with a minor productivity penalty. Mills with maximum width capabilities of 48 in. or more probably will decide not to even quote on supplying this product.
However, what if the part can be nested differently to save 1 in. on the width? Potentially, this new layout will create more engineered scrap in the 30-in.-wide coil. Although more scrap is never desired, this change could allow for an even greater amount of cost savings. The sheet mill now can roll this product as a 60-in.-wide coil, followed by center slitting. This significantly reduces the cost of production, and some of this savings can be split between the customer and supplier.
Even without split savings, the part manufacturer benefits from an increase in potential suppliers, and the sheet mill benefits from the ability to quote competitively on new business.
Ideally, at the beginning of the part-development process, the stamping company surveys all suppliers to know their pricing at every combination of thickness and coil width for each grade of interest, with these constraints factored into their sheet metal requirements. Reality usually differs, where dozens or hundreds of parts must be processed, sourced and assembled by an understaffed team in a reduced time frame compared with the prior model. RFQs go out with constraints often dictated by what was used in that prior model, and not necessarily optimized to fit current supply options.
Bring Suppliers Into Design Process for Best Results
Mutually beneficial opportunities await those suppliers willing to learn how their customers process sheet metal and understand the rationale behind the choices made. Potential areas for cost savings include part consolidation leading to structural improvements, and balance of the grade selection against the selected lubricant. Suppliers included in the part-design process provide the greatest impact on cost and quality.
Stamped parts are joined using welds, rivets and other means. Fewer stamped parts mean not only fewer stamping and assembly resources needed, but result in cost and weight savings due to the elimination of flange surfaces for joining. Fewer joints improve structural integrity and reduce the opportunity for fatigue and vibration issues.
Several approaches result in structural improvement. One: tailor welded blanks, where flat sheets of the proper combination of grade, thickness and coating are welded together and then stamped. This contrasts with attempting to join already-formed parts, each with different levels of dimensional accuracy. Another mature process that can facilitate part reductions using appropriate designs is hydroforming, which has documented 50-percent fewer parts and 20-percent lighter weight on automotive radiator supports and engine cradles.
Applying engineered lubricants facilitates the use of a lower-cost metal grade having lower formability. Although the current approach may be less expensive per gallon than an engineered lube, manufacturers design many of today’s lubricants to function at very low application levels. This reduces consumption, with the additional benefits of a safer plant floor and lower OSHA-compliance costs.
Equivalent structural performance may be achievable with substitution of higher-strength metals, at reduced thickness, into the design. This approach saves weight, and perhaps without a significant cost penalty. While the higher-strength metal likely costs more per lb., its reduced thickness means less to purchase. Proper lubricants help overcome any decreased metal formability.
An internal team with knowledge of part development and die processing helps, as does access to forming and structural simulation software. Even with no necessary skills available inhouse at the metal supplier, several companies have the experience and expertise to assist with these challenges. Partner and learn from them to grow the talent within your company. Over time, you will see best practices while honing your skills. Soon you will become the indispensable partner sought out by potential customers.
Author: Daniel J. Schaeffler, Ph.D.
First published in the December 2018 issue of MetalForming Magazine
Simulation has made inroads into the metalforming community as an ideal way to predict what will occur when sheetmetal of known properties is subjected to known deformation forces. It saves days of trial-and-error, helping to evaluate what-if scenarios associated with variables such as metal grade and thickness, binder and addendum designs, and blank shape.
It is, however, risky to blindly accept simulation output as infallible. Simulations are accurate, but only to the extent that the inputs represent reality as opposed to a simplified estimate of reality. Simplification begins with the imported CAD file. No doubt that the design in the file was accurate at one time, but most likely that dates back prior to tool construction. Once fabricated, tooling likely undergoes some period of adjustments to achieve a good part, such as, for example, using spotting blue to check a bearing. By grinding anywhere on the tool and especially on a draw bead, you’ve made a permanent change to the metal flow in that area. Best practice: Re-scan the tools once they produce good parts. This provides a record of the tool surface responsible for today’s parts.
Recent years have seen more attention paid to the weight of forming tools, with the focus on making them lighter. This has led to structural analyses of the tooling to ensure mass only where it contributes to functionality. The expectation is that reduced mass does not impact tooling stiffness, and what remains is the minimum functional structure. During the buyoff process, retaining the tooling surface may make this an acceptable strategy.
We know that issues with springback increase with stronger sheetmetals. In the hands-on process of minimizing springback during physical tryout, recuts become inevitable. Since each iteration removes tooling metal, tooling stiffness can be affected. In most simulations, assumptions include rigidity of the tool, ram and bolster, with no deflection under load of any component. But rarely does this accurately represent reality.
Factors Affecting Accuracy in Forming Simulations
The Modulus of Elasticity (E), an important input into forming simulations, is critical to obtaining an accurate assessment of springback. Textbook values for E include 210 GPa and 70 GPa for steel and aluminum, respectively. However, these values change based on specific grades or alloys. These textbook values typically are determined in tension. However, while considering springback, one should take into account the modulus from unloading. According to some studies, the unloading modulus may be 25 percent less than the modulus determined during loading. Furthermore, the modulus changes based on the level of plastic strain seen in each region of a part.
Density represents another parameter where, previously, textbook values may have been sufficient. Steel density does not vary much between mild-steel grades, but higher-strength steels use non-iron elements in greater amounts, which changes the alloy density. Aluminum alloys in the 5XXX or 6XXX series achieve their properties with different alloying approaches, with the resultant density a function of the type and concentration of the chosen elements. The Aluminum Association Teal Sheets lists the density of different aluminum alloys.
Simulations Does Not Consider the Effects of Temperature
When assuming that room-temperature stampings stay at the same temperature throughout the press cycle, many simulations neglect to take into account the temperature’s impact. When forming higher-strength alloys even under ideal conditions, the temperature at contact radii substantially exceeds room temperature. Work from Professor Altan’s R&D group at Ohio State University has shown that, in identical setups resulting in a maximum temperature of 120 °F when forming mild steel, temperatures of 175 °F were reached when forming DP600 and AA5182-O, and DP980 reached 210 °F with DP1180 heating to 300 °F, again under identical thickness and forming conditions. At these elevated temperatures, die sections will expand, which changes clearances and metal flow.
Although some lubricants are designed for higher temperatures, you may be choosing the wrong one if you think that you are performing only room-temperature stamping. Elevated temperatures seen at contact points can lead to lubricant burn-off, resulting in no lubricant at the most critical locations. Among other things, this accelerates wear, a circumstance not accounted for in the simulation.
Simulations Only Offer One Input for a Friction Value
Most simulation programs offer one input for a friction value, which we know varies across the entire part and is based on local conditions. Friction changes with contact pressure and temperature, as well with the lubricant additives active under those conditions. Different tests, such as Draw Bead Simulator, Twist-Compression or Pin-On-Disk, can determine friction. The resultant values differ as the test conditions differ. For steels, friction changes based on the galvanized coating. Not surprisingly, a hot-dip galvanized coating has a different friction than electrogalvanized or galvannealed coating. Since the surface morphology of any one of these coatings can differ between suppliers, friction can vary even within a given coating.
A required simulation input is your choice of material model. Which one is best? Unfortunately, no one right answer applies to all metals and forming conditions. A natural tendency may be to use a model not requiring the entry of many parameters, perhaps one that uses only uniaxial-tensile-test values. While easier, these models are not as accurate.
More accurate models typically require results from tests not commonly performed. Without the correct data, people may choose values generated from other materials that may not be applicable for your particular product. Also, while tensile-testing procedures are very well-defined, results still differ from lab to lab. The test procedures needed for more complex models are not as rigorously defined as tensile testing, so variability in these tests are much more likely.
Simulations offer a choice of what material properties to include.
Some packages automatically vary the properties between low and high values. If you are not using such programs, you should manually test the effects of different properties. The inclination may be to run worst-case examples, but your selection must be realistic. Simply inputting low-end properties is inappropriate. This is because our supplier cannot produce a sheetmetal with the lowest yield strength combined with the lowest elongation and lowest n-value. While you may not worry about splits on a high-ductility metal, wrinkles are a concern, which, in turn, can restrict metal flow. Most forming simulation programs require r-value as an input. Not only does r-value change with orientation relative to the rolling direction, but the magnitude of this change is not consistent between grades. R-value changes with plastic deformation, which means that metal formability changes during the press stroke. Simulation software packages typically do not account for this.
Forming in the virtual press shop is an efficient way to test variables you might eventually see in production. Understand the limitations of your virtual press shop and the impact of the assumptions made while developing robust stamping.
Author: Daniel J. Schaeffler, Ph.D.
First published in the November 2018 issue of MetalForming Magazine
Bethlehem Steel, U.S. Steel, Alcoa, American Can, General Electric, General Motors, Goodyear and Navistar. These eight manufacturing companies were among the 30 listed companies on the Dow Jones Industrial Average in 1988, MetalForming magazine’s first year. None of these currently occupy the Dow, and two no longer exist. A lot can change in 30 years, but much, too, stays the same.
Import relief was an important topic then as it is now. In 1984, the United Steelworkers of America and Bethlehem Steel petitioned the United States International Trade Commission for relief from imports under Section 201 of the Trade Act of 1974. Rather than traversing that path, the government instead successfully negotiated “Voluntary Restraint Arrangements” with many countries in order to limit imports. These lasted until the following decade.
In 1988, hot-rolled steel coil sold for $400/ton. Almost 15 years later, the price bottomed out at $200/ton. Today, it hovers near $900/ton, owing at least partially to industry consolidation and recently imposed tariffs.
Aluminum also has experienced price swings, though the $2000/ton base cost matches 1988 numbers. An influx of Soviet exports 30 years ago and high power prices today contribute to the price fluctuations experienced over these years.
The 10 largest steel companies combined to contribute less than 20 percent of the 780-million-ton global output in 1988. Companies in the USSR produced 21 percent, and combined with companies in Japan (14 percent), the United States (12 percent) and China (8 percent), made up more than half of the world’s total. Today, the market share of the 10 largest steel companies totals 38 percent, with more than 1.6 billion tons produced worldwide. Of this, half is made in China, with the United States, at 80 million tons, placing fourth and representing five percent of the global total. In 1988, U.S. Steel was the fifth-largest steelmaker in the world, producing 14 million tons that year. U.S. Steel still makes the same amount, yet only ranks 26th.
The United States produced 4 million tons of primary aluminum in 1988, representing 20 percent of the world’s total. Those numbers have shrunk to 800,000 tons, representing two percent of the 63-million-ton global total. The 10 largest primary aluminum companies represent 53 percent of market share, with Chinese companies responsible for more than half of the global output. Alcoa, the only U.S.-based company in the top 10, produces 2.3 million metric tons, the bulk of which comes from outside of the United States.
U.S. secondary aluminum production has increased dramatically, owing to scrap-collection programs and significantly lower production-energy requirements, rising from 2.4 million tons in 1988 to 3.7 million tons today, which represents 36 percent of the global total. Chinese companies account for 2 million tons, or 20 percent of the worldwide amount. Production should increase in the coming years as more recoverable scrap becomes available.
Beverage-can production in the United States has increased 25 percent over the past 30 years, from 80 million cans annually to 100 million. A typical beverage can weighed 16.6 g. when MetalForming magazine debuted. The weight has dropped to 14.9 g./can due to manufacturing and processing improvements that allowed for the production of thinner but stronger sections. This may not seem like much, but it translates to five additional cans per pound of purchased aluminum, corresponding to a 15-percent increase in product from each coil.
Globally in 1988, 780,000 people had jobs in the steel industry. Employment has fallen by half in the United States, dropping from 280,000 jobs responsible for producing 90 million tons to 140,000 making 80 million tons. This trend likely will continue—a new Austrian mill can produce 500,000 tons with only 14 people. Aluminum sheet/plate/extrusion mills employ 65,000 people domestically, which should increase as new capacity comes online.
New Alloys
Steel producers were investing in new technologies as MetalForming launched. Continuous casting (concasting) of steel is taken for granted now. However, in 1988, 40 percent of U.S. steel production involved ingot casting. The year 1988 saw construction of the first thin-slab continuous caster for flat-rolled steel at a minimill. This started the competition between scrap-based producers and integrated steel companies that had dominated the industry for decades.
Concast steel, with its lower production costs and improved internal quality and more consistent properties, took over from ingot casting. In Japan, the free-world’s leading producer at the time, nearly all steel was continuously cast. A fact at least partially responsible for the belief that Japan produced better steel than the United States. The domestic steel industry was undergoing significant restructuring— closing many plants and laying off hundreds of thousands of workers. Nearly every U.S.-based steelmaker took on equity investments and/or entered into joint ventures with Japanese steelmakers. This allowed for both a cash influx and technology transfer. The Japanese steelmakers avoided limits on exports and gained a foothold in the United States. This happened at a time when transplant automakers were growing and wanted to buy the same steels as available in their home country.
Hot-mill modifications were introduced in the 1980s. These modifications allowed for controlled-cooling thermal profiles that led to new higher-strength hot-rolled products with enhanced formability. Many steelmakers installed vacuum degassing units, which enabled the production of steels with greater formability. These steels were demanded by the automotive industry. This, combined with the ability to roll thinner and wider, a characteristic associated with continuous casting, gave users a greater selection of products from which to choose.
The late 1980s saw the first use of aluminum alloys in exposed automotive applications, with AA6111 and AA6016 recently commercialized. Development continued, leading to the creation of AA6016A and AA6022 in 1995, and AA6451 a decade later. These represent the workhorse grades for high-quality stamped sheets in use today.
Panels and Press Shops
Although noncontact quality-control tools are in routine use in many press shops today, the 1980s offered fewer options. Computing power, an expensive proposition back then, required extensive floor space. And what was programmed into computers? Machine control software was understood only by a select few.
Any tool considered relatively fast and easy to use was looked upon as providing indispensable information. Stamping plants used the Limiting-Dome-Height (LDH) test 30 years ago to determine whether a split part resulted from sheetmetal properties or from the stamping process. Unfortunately, the evaluation after purchasing a lot of test equipment revealed that too many variables existed to consistently draw the same conclusion under supposedly identical test conditions. The LDH test is better suited for lubricant evaluations, where it continues to be used today.
Forming simulation, so critical now in saving significant time and money during part development, was essentially nonexistent in 1988. Established yield criteria could not accurately comprehend anisotropic forming behavior. Nonlinear finite-element analysis was possible, but excessive computing time on workstations limited its routine use. Thirty years later, you can run simulations on your PC. Simulation-as-a-service business models exist today, allowing you to upload CAD files and receive results a short time later. Current programs accurately predict thinning, stresses and strains, and metal flow for many different sheetmetals and forming processes.
Author: Daniel J. Schaeffler, Ph.D.
First published in the August 2018 issue of MetalForming Magazine
Every stamped part contains at least some sources of variation that will never be eliminated—perhaps from the sheetmetal, lubrication, stamping process or any one of the many other aspects of the forming system. It is important to understand the sources of variation so that we can design our forming system to be more tolerant of inevitable variability inherent in the inputs.
All input process settings revolve around target value and a tolerance—the basis for one of the largest sources of variation. Consistency of sheetmetal strength is affected by variation in alloy melt chemistry, thickness reductions during rolling and annealing temperature, to name just a few of the inputs. In turn, consistency in strength is one of many variables that affects the dimensional precision of a formed part. If comparing the measured strength over many coils against how often those values occur, they would start to resemble a bell-shaped curve, or what statisticians call a normal distribution. A tight bell curve indicates little variation in measured values, with most readings concentrated near the average value. A wider curve indicates a greater deviation from average.
Let’s put this into different terms. The median driving distance off the tee for a (non-pro) male golfer is 220 yards. This does not mean that all shots will travel 220 yards, but, instead, half of his shots will travel longer and half will fall short. For a consistent golfer, more shots will travel closer to this average rather than spread out over a greater distance.
Now imagine sand traps at 170 and 270 yards. A more consistent golfer able to hit all shots within 50 yards of his average won’t need to change his approach. However, the golfer whose skills would otherwise result in a driving distance of, say, between 160 and 280 yards either will need to adjust his process controls or accept that some shots will fall in the bunkers.
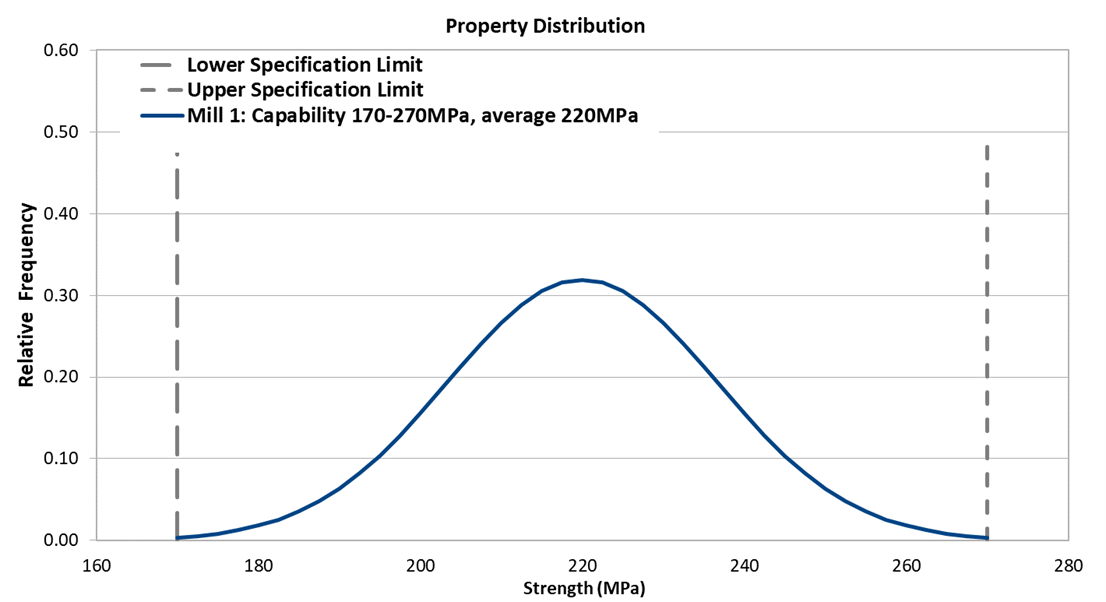
Similarly, consider sheetmetal production of a grade intended for a part requiring strength between 170 and 270 MPa, representing the lower and upper specification limits. That does not mean that production cannot result in strengths falling outside of this range—just that the product shipped to the customer must meet the range constraints. Fig. 1 depicts a supplier with a production capability that takes up the full range of allowable strength levels. This supplier’s approach satisfies the application needs, at least in terms of strength.
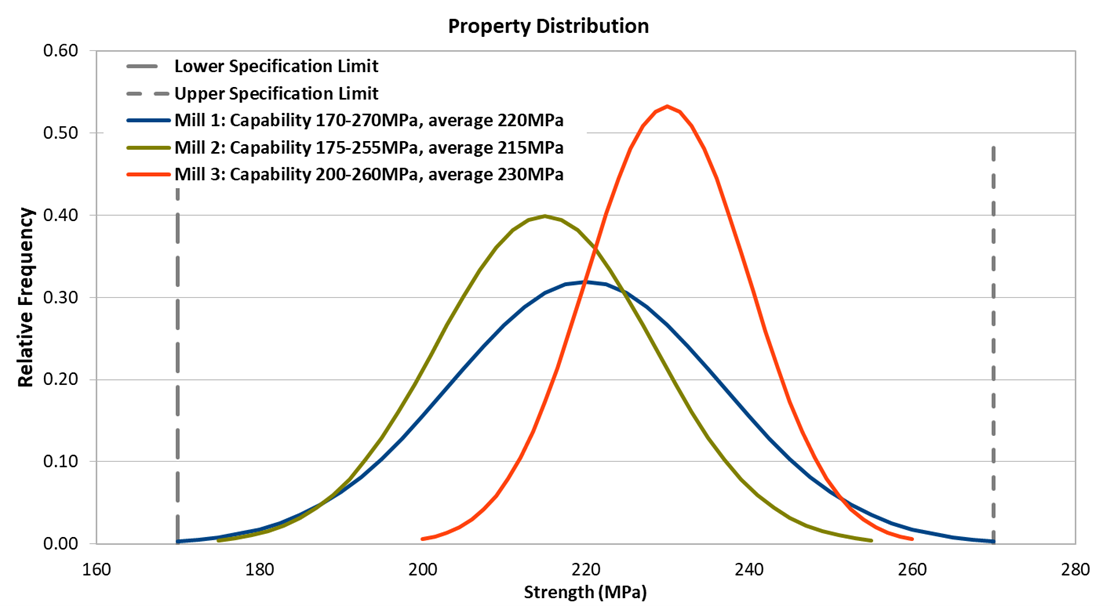
Each company uses different equipment and different process-control capabilities, which affect the property variability of shipped coils. Fig. 2 shows the property variability of three suppliers. All can satisfy the strength requirement. The average strength of the product shipped from mill 2 is lower than that from mill 3. Remember that lower strength commonly is associated with a more formable product. However, the parts manufacturing company still may prefer to receive sheetmetal from mill 3. Even though the material is stronger and probably less formable, it comes in a tighter range. With this reduction in incoming variability, the stamping plant may better control the parts it produces.
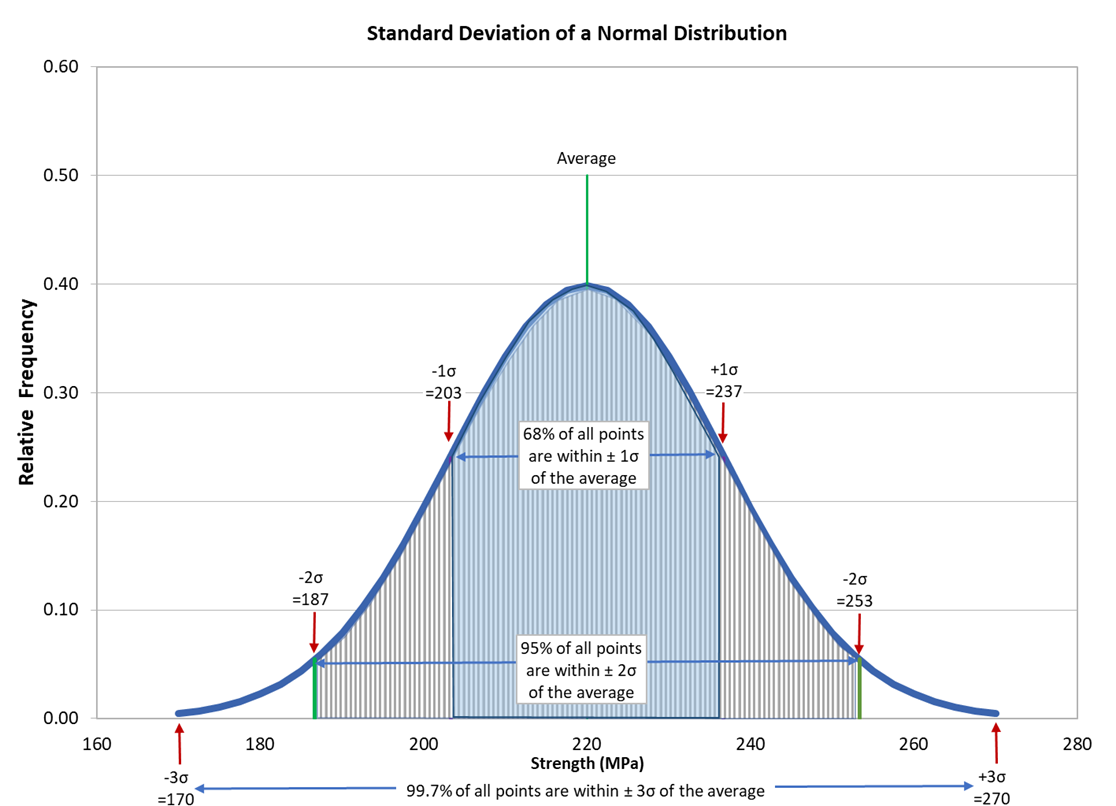
A mathematical term, standard deviation, describes this variability. This is represented by the lowercase Greek letter sigma, or σ. Knowing standard deviation helps estimate test result likelihood and proximity to average tolerance. Two-thirds of all test results will fall within one standard deviation of the average (Fig. 3), meaning that one-third of all test results will fall outside of this range. However, more than 95 percent of all
results will fall within two standard deviations of the average value (average ±2σ). A range of ±6σ (six standard deviations) encompasses 99.73 percent of all results. This corresponds to a Process Capability Index, or Cpk, of 1.0. A Cpk of 1.33 is associated with readings within ±4σ of average (63 out-of-compliance results for every one-million tests). While a Cpk of 1.67 corresponds to all readings falling within ±5σ of average (one defect per one-million tests).
Tighter process controls will decrease the standard deviation. There may be valid reasons why your supplier is not implementing all steps to reduce variability when it already can meet the specified tolerances. For example, the alloying-element range in the melt specification likely is wide to produce several grades from that one set of chemistries. This allows for production efficiencies and provides for steady-state processing conditions that will improve process quality. Similarly, adjustments in the
annealing temperature cannot be realized instantaneously in the furnace. Rapid changes bring a greater risk of undershooting or overshooting the targeted value, leading to a wider property variation in the finished product.
Author: Daniel J. Schaeffler, Ph.D.
First published in the July 2018 issue of MetalForming Magazine
With a part to manufacture, your first decisions revolve around how to generate that part and what material to use. Manufacturing options include casting, hydroforming and 3D printing, but you already have the experience and infrastructure for stamping. Factors such as cost, weight, corrosion resistance, strength and stiffness go into the discussion of what sheetmetal to select. With the material type selected—steel, aluminum, stainless, brass, etc.—you must order it from a mill or service center. At this point, “Give me what I need,” is not good enough. Here, specifications come in to play.
A material specification is simply a list of requirements and characteristics that the supplier must meet to provide a satisfactory product. The spec can call out limits of alloying-element composition levels, thickness, flatness and tensile properties. Any organization can create this listing, including industry organizations such as American Society for Testing and Materials, American Iron and Steel Institute or the Aluminum Association. End users such as General Motors or Boeing, or the materials producers themselves, often write specifications as well.
Even if you seek generic grades, chances are that you are ordering to these documents whether you know it or not. When specifying only AA6061 aluminum or AISI 1010 steel, your supplier will default back to these and related documents to determine what to supply. When ordering these generic grades, several suppliers are available, with a greater chance that the materials will be in stock. And, these materials often cost less than those with tighter constraints.
Material Specifications May Be Too Generic
The risk with this approach: The material supplier must meet only what is stated in the specification, and not what is otherwise expected based on what you had received previously. For example, suppose you have been ordering “1008 steel.” SAE J403 Grade 1008 represents the only specification document that defines what 1008 steel entails. This document defines chemistry limits, and little else.
The allowable range of carbon for this grade lets the service center provide anywhere from ultra-low carbon, extra-deep-drawing steel with carbon levels close to 0.002 percent, to a higher-strength steel with “10 points” of carbon, or 0.10-percent carbon content. This chemistry range alone may result in a yield-strength spread of 140 MPa, and the steel service center can provide either one or something in between that still meets the requirement of 1008 steel. Again, the material specifications does not call out any limits on tensile properties such as strength or elongation. Specifications for higher-strength grades likely list minimum required strength and elongation levels, and some may cap yield strength.
Services centers can profit by buying coils that may not be suitable for their initial application but are otherwise satisfactory, and, therefore, have a relatively low purchase cost. A common issue in as-produced coils is flatness outside of allowable limits. Many material suppliers may have the equipment needed to correct flatness. This is a good way for them to buy what was initially deemed a sub-prime coil and rehabilitate to prime condition. The leveling and flattening processes involve passing the coil through many rolls, which results in increased strength and decreased ductility of the material.
Even though the mechanical properties have changed, the chemistry remains the same. This means that your service center may ship you a flattened coil with different strength and elongation than coils received in the past. This reprocessed coil will differ from what you are used to receiving. It may not form the same way as prior coils—you could see increased scrap—but since the composition conforms to 1008 steel, you received what you ordered.
Be Specific if the Application Calls for It
Specify tighter incoming properties by using a different specification or adding line items to the order. Not surprisingly, the more constraints placed on an ordered product, the greater the possibility of a higher cost. When deciding what material specifications to include on an order, balance price savings of ordering to a generic material specification against the cost to any downtime associated with additional variability, manufacturing-productivity losses and increased scrap.
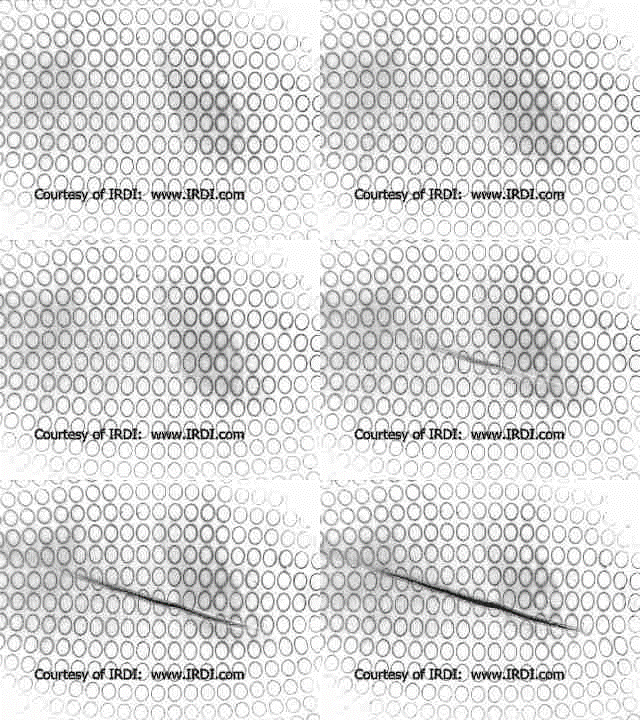
Thinning and Circle Grid (Surface) Strain Analyses are Engineering Quality tools that can help determine where trouble spots could develop during the production processing of your parts. The forming limit of a given steel is based on the thickness and the strain hardening exponent (n-value). The forming limit for other alloys must be determined experimentally. Knowing these parameters, and their minimum values likely to be encountered in production, it is possible to assess if the stamping process is inherently robust enough to withstand the normal variation in material properties.
Engineering Quality Solutions team members have been conducting circle grid analysis for over twenty years. Our experience enables us to not only perform at a high level, but also teach circle grid analysis to companies and individuals who are interested in understanding the strains produced during the forming process.
Advanced High Strength Steels have been gaining ground in an automotive industry hunting for all the weight savings it can while satisfying or surpassing safety standards. The material could be called the next step in steel’s evolution toward exhibiting the high-strength, lightweight characteristics of more expensive materials, like aluminum and magnesium.
Challenges arise, however, from a formability standpoint. The varieties of AHSS do exhibit high formability, but in entirely different ways from legacy materials. Springback isn’t the only concern – metal formers need to throw out the old rulebooks. AHSS has spurred stampers to think about metal forming in new, unconventional ways.
Author: Daniel J. Schaeffler, Ph.D.
First published in the June 2018 issue of MetalForming Magazine
Stainless steels can corrode—they’re called stain-less after all, not stain-free. They offer many grades from which to choose, providing a wide spectrum of uses and challenges.
The five main categories of stainless steels, designated by their predominant microstructural phases and characteristics:
- Austenitic
- Ferritic
- Martensitic
- Duplex
- Precipitation-hardened
Like all steels, each of these have iron as the primary element. Corrosion resistance of stainless steels results from the reaction of microstructural chromium with the atmosphere, forming a tenacious oxide layer only one-millionth of a millimeter thick. This reaction begins when the iron-based alloy contains at least 10.5-percent chromium, making 10.5 percent the minimum amount of chromium possible in stainless steels. Corrosion resistance typically improves with increasing chromium content. Formability, strength, toughness and other properties of individual grades within the five categories result from the type and distribution of additional alloying elements.
According to the International Stainless Steel Forum, the combined market share of martensitic, duplex and precipitation-hardened stainless steels totals less than 5 percent of all stainless applications. Martensitic stainless steels, like their carbon-steel equivalents, offer high strength and limited formability. Duplex grades blend the merits and challenges of their austenite and ferrite component phases. Precipitation-hardening stainless steels can maintain corrosion resistance after heat treating, enabling them to reach strengths of 1800 MPa.
Nearly three-quarters of all stainless applications use austenitic grades. These 300-series stainless steels are made from alloying iron with chromium (16 to 26 percent), nickel (6 to 12 percent) and other alloying elements such as molybdenum. Adjusting the alloy content can maximize corrosion performance in different service environments, such as marine or those with high or low temperatures.
Austenitic Stainless Steels
The most malleable types of steel are the austenitic grades. These steels strengthen when formed, as their high n-values lead to work-hardenability. Austenitic grades of steel, although non-magnetic in their initial state, develop a slight magnetic property after being shaped into components.
SS304, the most frequently used austenitic grade, has a composition of 18-percent chromium and 8-percent nickel, and sometimes is referred to as 18-8 stainless. Another common austenitic grade, SS316, has similar chromium and nickel content in addition to about 2-percent molybdenum for enhanced corrosion resistance.
Increasing nickel content allows the austenite phase to form more readily at room temperature, and is associated with increased ductility. However, the commodity price of nickel can vary greatly, from $50,000/ton in 2007 to one-quarter of that today. Nickel price is a key driver of 300-series stainless-steel pricing as it comprises about 10 percent of the alloy content. To get around high nickel prices, 200-series austenitic stainless steels were developed, where various amounts of manganese, nitrogen and molybdenum replace some nickel content.
During cooling from welding or annealing temperatures, chromium in austenitic combines with carbon to form chromium carbide. These precipitates occur at the microstructural grain boundaries. In a process called sensitization, chromium feeds the carbide formation at the expense of the surrounding metal. With now-lower chromium content, the grain boundaries are at risk for corrosion. Using grades with reduced carbon content of 0.03 percent rather than the standard 0.08 percent reduces the tendency for chromium-carbide precipitation, as will alloying with titanium and/or niobium, which combine preferentially with carbon. Manufacturers designate austenitic grades with a lower carbon content with the suffix L, such as SS304L or SS316L. They minimize sensitization in ferritic stainless steels using specific thermal profiles.
Ferritic Stainless Steels
Ferritic stainless steels comprise part of the 400 series, and contain chromium (12.5-17 percent) as the primary alloying element. These stainless steels, ferromagnetic and generally having adequate formability, are essentially nickel-free, making them a lower-cost option to 300-series austenitic grades. Ferritic stainless steels are at risk of grain growth with an associated loss of properties when welded in thicker sections. Unlike austenitic stainless grades, the ferritic grades become brittle at low temperatures.
The most widely used ferritic stainless steel is SS430, while SS409 has a greater corrosion risk due to its lower chromium content. SS439 offers greater resistance to corrosion and improved high-temperature stability, making it suitable for exhaust systems. Using titanium and niobium to tie carbon and nitrogen into fine precipitates results in improved formability–the same mechanism employed in the production of interstitial-free extra-deep-drawing ultra-low-carbon steels.
Processing Stainless Steels
Annealed austenitic stainless steels have greater shear strength than carbon steels, which results in requiring more force to shear stainless alloys of equal thicknesses, necessitating greater rigidity in the press and die sections to account for this increased strength. Austenitic grades work harden more than other grades. This gives them higher strength, especially in the cut edge. Flanging or otherwise expanding a poorly cut edge results in a greater likelihood of edge cracks. Minimizing rollover, by using well-aligned cutting tools with tighter clearances, improves the cut edge. However, tight clearances accelerate the wear of shear knives, making it difficult to keep cutting tools sharp and sufficiently aligned.
Computer-simulation models used for low-carbon steels are insufficient to model the forming and structural performance of stainless steels. Ferritic grades have a relatively constant n-value. Austenitic grades, on the other hand, have an n-value that changes with strain, test speed, and temperature. Austenitic grades have a “TRIP-effect,” which involves converting to martensite during forming. Incorporating this effect is necessary for making any prediction involving austenitic stainless steels.
Everyone likes to have a “Rule of Thumb” to use as a quick and easy guide. To make the best use of these maxims, it helps to understand where they came from, and what the limitations are in their use.
When it comes to taking the right steps to ensure a robust stamping process, a surface strain analysis using a forming limit diagram is recommended. The forming limit curve should be generated from the minimum allowable thickness and the lower mill production limit (or the -3σ value) for the strain hardening exponent, or n-value. To bypass some of the work involved in generating this information, some companies have chosen to use a rule of thumb that calls for a maximum 20% thickness reduction on a formed part compared with the initial flat blank thickness. In some cases, this is an acceptable substitution, but in many cases, using this 20% threshold only confuses the proper course of action.
More information about how the maximum thinning rule should be applied can be found in THIS FREE DOWNLOAD.
Let Engineering Quality Solutions teach you when and how to use this shortcut!
The correct way to use the Mylar strip is to measure from the center-width locations of the boundary line around the circumference of the now-deformed ellipse. Measuring from inside-to-inside or outside-to-outside is wrong! With a fuzzy ellipse boundary line (old stencil, poor gridding technique, etc.), it is not hard to make measurement errors more severe than just measuring the outside-to-outside dimensions of a crisp circle/ellipse. The width of the line forming the boundary of an etched circle is about 0.008″ which is also the thickness of the lines of the Mylar strip commonly used to measure the deformed ellipse manually (the diverging railroad tracks). If you are measuring inside-to-inside of a ellipse that was formed after starting with a 0.100″ diameter circle that was stretched 20% in one direction, you’ll measure the major axis as 0.120″-0.008″, or 0.112 inch, which is 12% on the major strain axis. You’ll also run the risk of measuring the minor strain wrong at 0.100”-0.008”, or 0.092 inch, which corresponds to a minor strain of -8%. Similarly, if you are measuring the outside-to-outside dimensions, you’ll wind up with 28% on the major strain axis and + 8% on the minor axis. A poor technique can turn a correct (20%, 0%) reading into anything between (28%,8%) and (12%,-8%)! Unless you are measuring from exactly the center- width position on the line making up the circumference of the circle/ellipse, you can get vastly different results, confusing the strain analysis interpretation.

The Tool & Die Authority was published by the Precision Metalforming Association as a combination of blog-style news and exclusive information about tool and die companies, markets, customers and much more. TDA provided solid technical tips not found anywhere else that helped tool and die operations solve a range of challenges, enabling them to offer top-notch service to their customers while improving their bottom line.
Danny Schaeffler may be the current Science of Forming columnist, but Dr. Stuart Keeler was the founding columnist where he wrote nearly 200 articles. Engineering Quality Solutions is a proud sponsor of the Science of Forming Vol. 2, a CD-ROM containing many of the material-formability articles and tutorials by metalforming expert Stuart Keeler. Dr. Keeler is best known worldwide for his discovery of forming limit diagrams, development of circle grid analysis and implementation of other press shop analysis tools.
Articles you will find on the CD include:
Virtual Sheetmetal Forming–An Overview
What is Science of Forming?
Help Your Sheetmetal Supplier Help You
Material Properties: Typical or Worst-Case
Learning About New Forming Technology
Statistical Deformation Control for Stamping Evaluation
Cups and Boxes are Different
Deformation Through a Draw Bead
Troubleshooting — Using an Extra Eye
Final-Die-Buyoff Procedures
Attacking Process Variation
How Important is Die Transition?
The Die Has a Fever?
A Tale of Three Press Shops
A Complaint Heard Too Often
Ultrasonic Thickness Gauges Show Forming Severity
Why Certain Defects Occur
Troubleshooting — Lost in the Jungle?
Stamping Tears Can Confuse Troubleshooting
Forming Characteristics of Higher-Strength Steels
What is Dual-Phase Steel?
What Really is Grain Direction?
Springback Revisited
Maximum Forming Speeds?
Myth or Truth in Metalforming
Deform in One Direction or Two
How Much Does Metal Thin?
Forming Problems with Higher-Strength Steels
A Forming Limit for Thickness Strains
The New Dual-Phase Steel
The New TRIP Steel
Does Steel Get Brittle as It Gets Stronger?
What is the r Value?
Abstract
Sheet metal production isn’t much different than baking a cake. It requires the right ingredients, added at the right time and processed at the right temperature for the right amount of time. Literally hundreds of different types of metals are available, each with it’s own blend of physical, chemical, and surface properties and characteristics.
Pure metals are relatively soft and malleable. When you move a carpet, it takes alot of force to pull the carpet from one end. However, if you create a little wave or ripple and propagate that through the carpet, it becomes much easier to move. Metal forming on the atomic scale is similar.
Atomically, a pure metal can be pictured like 3-D network of racked billiard balls all the same size. The gaps in the atomic structure, called dislocations, are necessary for metal flow. As these dislocations propagate through the workpiece, any deviations from the homogenous pure matrix element will require more effort for the dislocations to move around it. All pure metals are relatively soft and malleable for this reason.
To determine if a grade of steel is prone to secondary cold work embrittlement, the ductile-to-brittle transition temperature (DBTT) is determined. The DBTT is the highest temperature at which a brittle crack is formed.
More information about the cause for secondary cold work embrittlement and how to test for it can be found in THIS FREE DOWNLOAD.
Let Engineering Quality Solutions determine if your grade is at risk for secondary cold work embrittlement!
Think about pulling a bar in tension. Load divided by cross-sectional area is force, or stress. But what cross section are you considering? Before starting that pull, the bar had a known cross-section of, let’s say, 0.5″ wide x metal thickness. It’s easy to measure these, since it is your starting material. At any load, the engineering stress is the load divided by this initial cross-sectional area. While you are pulling, the length increases, but the width and thickness shrink. At any load, the true stress is the load divided by the cross-sectional area at that instant. Unless thickness and width are being monitored continuously during the test, you cannot calculate true stress. It is, however, a much better representation of how the material behaves as it is being deformed, which explains its use in forming simulations. In circle grid analysis, engineering strain is the percent expansion of the circle compared to the initial diameter of the circle. The relationships between engineering values and true values are:
σ = s (1+e) ε = ln (1+e)
Where “s” and “e” are the engineering stress and strain, respectively, and “ σ ” and “ ε ” are the true stress and strain, respectively.
NONE!!!
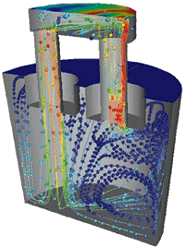
Steel is, by minimal definition, an alloy of iron and up to 2 percent carbon (if it is more than 2 percent, the alloy is cast iron). Carbon is small enough to fit into the interstices (gaps) of a primarily iron matrix, making it an “interstitial element” in steel. If the steel alloy has an ultralow carbon level (typically less than 50 parts per million), most of these gaps will not be occupied and, as such, can be called interstitial-free (IF) steel. These very formable IF steels are extra-deep-drawing steels (EDDS) with a microstructure that is 100% ferrite (nearly pure iron). Achieving this low carbon level does not occur using conventional steel processing. Instead, the molten steel must be put under a vacuum that decarburizes it by removing carbon monoxide, as well as other gases like hydrogen and nitrogen. This process is called vacuum degassing, and it is done in the production of vacuum degassed interstitial-free steels (VD-IF).
Abstract
Challenges faced by stampers in the quest to produce a robust part are magnified when they form high strength steels. As materials increase in strength, the inherent tensile property variability increases. Using products from the family of grades known as the advanced high-strength steels (AHSS) complicate matters even more, since what is supplied from one mill may not be produced in the same way as that from another mill. Understanding how steel is made sets the stage for a more profitable relationship between the steel supplier and the steel consumer. The certified steel properties that come with the coil are useful, but more information about the sheet metal increases the likelihood of success.
Learn more about how the steelmaking process affects formability in this FREE Download.
Abstract
Understanding and compensating for the challenges associated with processing advanced high strength steels (AHSS) can help you minimize springback, edge cracking, trimming, wrinkling, and die wear.
Part I of this two-part series presented an overview of advanced high-strength steels (AHSS). This article addresses issues encountered when processing these grades.
Using AHSS in appropriate applications offers opportunities for reduced product weight, enhanced crash performance, manufacturing process consolidation, and cost reduction. However, because these grades have different microstructures, chemistries, and properties, die processing must be optimized to take advantage of the differences. Proactively addressing the associated challenges can help minimize costly tryout.
Abstract
Advanced High Strength Steels that exhibit high strength and enhanced formability are being offered around the world. These steels have the potential to effect cost and weight savings while improving performance.
The increased formability allows for greater part complexity, which leads to fewer individual parts (cost savings) and more manufacturing flexibility. Fewer parts mean less welding (cost and cycle-time savings) and weld flanges (mass and weight savings). Depending on design, the higher strength can translate into better fatigue and crash performance, while maintaining or even reducing thickness.
Author: Daniel J. Schaeffler, Ph.D.
First published in the May 2018 issue of MetalForming Magazine
The aluminum and steel industries continuously battle for supremacy in becoming the metal of choice in automotive body construction. This makes sense—with about 2 tons of sheetmetal purchased for each of the 17-million vehicles sold annually in the United States, there isn’t another industry that offers such high-volume sales opportunities. Each metal grade provides critical characteristics that help optimize the more than 500 stampings found in a typical vehicle.
A material’s strength is a function of its chemical composition, its thermo-mechanical processing route (e.g., converting from a thick slab to a thin sheet), and subsequent heat treatments. These variables make it impossible to state that one material always is stronger than another. For example, Many aluminum grades surpass steel grades in strength, but application purposes for both materials rarely overlap. Furthermore, strength is not the only consideration. Some of the many other facets considered include weight, formability, joinability to neighboring parts, stiffness, and cost.
Stiffness of a component is a function of material type and geometry. On the material side, stiffness depends on a property known as the modulus of elasticity, Young’s modulus. Unlike strength, which can vary from grade to grade (or even coil to coil), Young’s modulus essentially is constant for a given alloy composition, independent of heat treatment, processing or cold work. Young’s modulus for steel is about three times that of aluminum. A part made from aluminum will have only one-third the stiffness of a part made from sheet steel, for a fixed geometry. Put another way, an aluminum part under load will deflect three times as much as a similarly loaded steel part.
The thickness and shape of a formed part also contributes to its stiffness. Stiffness is proportional to the cube of the thickness. To neutralize the effect of aluminum’s one-third stiffness compared to steel, one must make an aluminum part 44 percent thicker than a steel part of the same shape. Even this increased thickness offers the potential for weight savings, as aluminum has one-third the density of steel.
For skin panels such as hoods, doors and liftgates, automakers prefer to use sheetmetal with strength as high as possible so that the panel will offer sufficient dent resistance. Thickness affects dent resistance as well, limiting the degree to which panel thickness can be reduced in the name of weight savings. Stiffness constraints further limit how thin skin panels can be. If too thin, the panels may start to wave and flutter as the vehicle travels down the road—unless character lines are added for “styling benefits.”
Automakers also must specify sheetmetal that can be produced to Class A surface standards. Current technology limits this to using sheet steel or aluminum with strength below about 300 MPa, although grades under development of both materials exceed this amount.
Joining does not present a significant hurdle, since several cost-effective techniques exist to mate the outer panel to the inner panel. When choosing between materials with similar upper strength and several sufficiently thin grades, the strategic choice for hang-on panel applications will be the one that offers the best combination of cost and weight savings.
Body-structure applications present many challenges. Increased stiffness will typically improve handling and reduce noise, vibration and harshness (NVH). In addition, NVH characteristics can be improved by using lightweight polymer sheets or foams. On the other hand, strength more closely associates with crash resistance. For the same design, steel offers a significant advantage in available choices. Without the constraint of a Class A surface, commercially available steel grades offer tensile strength exceeding 1600 MPa.
This isn’t to say that aluminum-intensive body structures are not possible—the market offers many examples. However, they skew toward more expensive vehicles where lightweight for fuel-economy improvements is not a primary issue. Sheetmetal cost becomes a smaller percentage of the transaction price. Improved crash performance comes with higher strength. This also means components with crash-resistant design elements such as closed sections, larger flanges, or more shape. All possibly requiring greater formability from higher-strength aluminum grades. Placing more shape into a part also increases stiffness. Consider a piece of paper: It’s pretty flimsy, but place a crease down the center and it becomes more rigid. Additional shapes placed into parts to restrict flexing include darts, beads and ribs.
Moreover, manufacturers must join these parts in a robust, high-speed, and cost-effective manner. Ford spent nearly $1 billion to rebuild an F-150 plant. They rebuilt the plant to stamp and assemble the aluminum-intensive cab and bed, and join it to a steel frame. This financial hurdle may limit the number of automakers willing to go all-in and make an aluminum-intensive body structure. However, the number of closure or swing panels made from aluminum alloys continues to grow.
Author: Daniel J. Schaeffler, Ph.D.
First published in the April 2018 issue of MetalForming Magazine
Aluminum alloys are categorized by a four-digit code. The first digit indicates the main element or elements alloyed with aluminum to produce the specific grade. Products with the same first digit are said to be in the same series or family, described by a number followed by three zeroes or “X”s, such as 5000-series or 6XXX-series aluminum. Within the same series, products share basic characteristics and applications.
Beverage-can bodies represent the highest-volume application for 3XXX aluminum alloys, which use manganese as the primary alloying element. Manufacturers produce 200 billion soda and beer cans each year–more than 6000 every second. In sheet form, alloys used to produce the cans are not inherently high-strength, but the draw-and-wall-iron process used in canmaking increases strength while reducing thickness to about 0.1 mm. (Fun fact: Carbonation increases the internal pressure of beverage cans—when stacked in a store display, they do not collapse. It’s even claimed that four six-packs can support a 2-ton vehicle.)
5XXX-series Aluminum Alloy
Magnesium is the main alloying element in 5XXX-series aluminum. Alloys in this series offer good combinations of strength and formability. However, higher strength levels introduce an increasing corrosion risk, especially as temperature increases. Alloys in the 5XXX-series may form Lüders lines during deformation, which eliminates their use in exposed applications. (Another fun fact: One-third of global magnesium production is used for alloying with aluminum.)
6XXX and 7xxx series Aluminum Alloy
6XXX-series aluminum uses a magnesium-silicon combination as the primary alloying elements. Like the 5XXX-series, good combinations of strength and formability exist, but here an exposed quality surface can be produced without risk of Lüders or other bands affecting the appearance.
The 7XXX-series grades feature some of the highest-strength aluminum-sheet alloys, but typically do not offer good formability at room temperature. Successful stamping may require forming at temperatures at or greater than 200 C. These products usually are riveted rather than welded, owing to the risk of weld cracking from a large solidification-temperature range. In addition to having zinc as the main alloying element, some grades also contain a combination of magnesium and copper.
Both 6XXX- and 7XXX-series alloys strengthen following heat treatment. This allows for stamping a lower-strength product, which, following processing, converts to a higher-strength product for industrial applications. For example, in automotive applications, 6XXX grades achieve full properties after stamping followed by a paint-bake (curing) cycle of about 185 C for 20 min.
Chemistry Range of Selected Aluminum Alloys
values in weight percent

The Importance of Scrap-Recovery System
An efficient scrap-recovery system maximizes the profitability of parts formed from these grades. When collecting steel scrap for recycling, stamping plants typically send all grades into one hopper. If done with aluminum stamping scrap, a significant loss in value would result. See the table, Chemistry Range of Selected Aluminum Alloys, for composition ranges of representative aluminum alloys. Compare the magnesium and silicon levels of the two 5XXX- and the two 6XXX-series products shown for an indication of why scrap segregation is important.
We are all familiar with beverage-can recycling efforts, which work because all can bodies consist of one of two grades, AA3004 or AA3104. Lids require higher-strength alloys such as AA5182 since they do not undergo the same forming process as bodies and, therefore, cannot work harden. Although AA5182 has a higher magnesium content, people consider it compatible with AA3004/3104 for recycling. Aluminum lines that melt and roll beverage-can stock typically only serve this market and have optimized chemistry and processing accordingly. The melt does not incorporate significant quantities of scrap from other 5XXX/6XXX applications since it would make it difficult to achieve the chemistry requirements of 3XXX-series can body material.
Scrap segregation takes on increasing importance for manufacturers targeting automotive applications. Engineered scrap can encompass 40 percent of large panels—consider the window cutout of doors. In preparation for the 2015 F-150 launch, Ford installed a $60-million pneumatic scrap-handling system that returned scrap aluminum back to the producer mill, creating a true closed-loop recycling process. Scrap value increased by 50 percent after segregating by grade and producer, allowing for a savings of $80 million/year and ROI within less than a year. In addition to exposed applications requiring 6XXX alloys, some companies use these products on unexposed applications as well to facilitate scrap recycling, in spite of the higher material costs as compared with 5XXX.
Automobile manufacturers have yet to specify 7XXX-series alloys for more than a few parts. When they do, separating different grades will take on even greater importance. This will keep copper and zinc out of the recycling stream of other aluminum-alloy families.
Author: Daniel J. Schaeffler, Ph.D.
First published in the February 2018 issue of MetalForming Magazine
“I need some cold-rolled for this part!” “Get me some 1008/ 1010!”
You might think that you know what you’re asking for, but when talking with your supplier, it’s important that you both use the same language to be sure you’ll get what you need.
 Sheetmetal
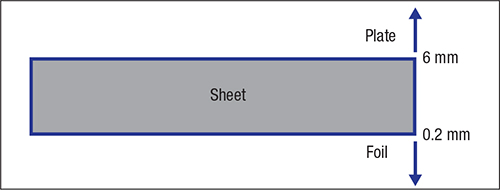
Sheetmetal is simply any metal alloy that stores as a sheet, or is coiled as a matter of convenience to ease handling–some coils stretch for more than a mile. Although no firm break exists between categories, for most alloys, sheet thickness ranges from 0.2mm to 6mm (0.008 inch to 0.25 inch). Plate refers to thicker material, while foil denotes thinner. Some use the term ‘shate’ for aluminum from 4 to 6 mm, too thin to be called plate.
The term sheetmetal only describes thickness, and does not inform as to width, chemistry or tensile properties. Coils produced at sheet steel mills typically measure 1000 to 2000 mm (40 to 80 inches) wide, with some aluminum mills capable of producing wider sheets. Rolling the thinnest-widest combination while maintaining tight tolerances on both is challenging for most production mills. This is one reason not all products are available at every thickness or width. A strip mill maintains tight thickness tolerances at relatively narrow coil widths, usually less than 600 mm (24 inches).
Understanding Heat Sizes, Continuous Casting, and Ingot Casting
Whether steel or aluminum, all coils start off as one batch of liquid metal, with each batch referred to as a heat. Heat sizes at steel mills can measure to 300 tons, while those at some aluminum mills approach 50 tons. Each heat has a uniform composition, so the chemistry reported on all products from the same heat will be identical. This usually is the chemistry measurement that appears in a listing of certified metal properties.
All steel and some aluminum mills convert liquid metal into a solid form via continuous casting, with the discrete solid units referred to as slabs. One heat can produce 10 or more cast slabs. Most aluminum mills, as well as mills working with other metals and alloys, cast liquid into individual units called ingots. Sometimes alloying elements segregate during solidification, especially during ingot casting. This may lead to a variation in chemistry in different locations, such as at the surface as compared with the center. However, the bulk chemistry remains the same as when the material was liquid.
Rolling and Pickling of Sheetmetal Coils
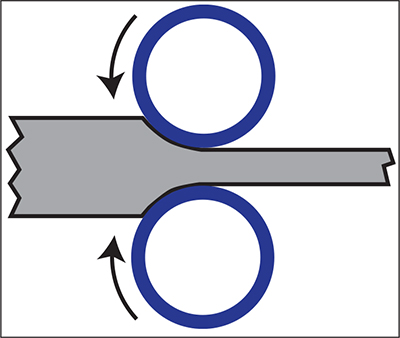
Rolling comprises the next major processing step in the conversion of a slab or ingot to coiled sheet (Fig. 2). Here, thickness is reduced in a way similar to the use of rolling pins for flattening dough. Sheetmetal requires more rolling force than bread, so initial rolling occurs at a high temperature, hence the term hot rolling. Elevated temperatures deliver an easier way to make larger thickness reductions in succeeding passes. Because width does not change, the metal band elongates with every thickness reduction, while also increasing speed through the rolling mill. Most sheetmetal grades slow-cool in coil form, while faster cooling rates change the microstructure to increase strength. For at least some grades, hot-rolled alloys can carry the same strength and ductility as cold-rolled grades, but usually with different property ranges, wider dimensional tolerances and rougher surfaces.
Steel surfaces oxidize and create scale, a form of iron oxide that must be removed before further processing—performed by passing the material through acid in a pickling step. Rust-preventive oil added to the surface, if this is the desired end product, leads to the term “hot-rolled, pickled and oiled,” or HRPO. Some hot-rolled steels measure as thin as 1.5 mm, with 3-5 mm typical for most production mills. Should thinner material or additional processing be required to develop desired properties. The steel hot band is sent for cold rolling. Limited industrial applications exist for stamped aluminum sheet after hot rolling. This makes the process primarily an intermediate step prior to cold rolling.
As the name indicates, cold rolling occurs at ambient temperatures. Thickness reductions of 70 to 90 percent creates targeted properties of the ordered material. This rolling step increases material strength to the full-hard condition, but the material is now too brittle for a select few applications. Annealing, or heating the coil above a critical temperature, relieves internal stresses in the sheetmetal. Changing how the steel or aluminum cools from the annealing temperature affect its tensile properties. Calling something “cold-rolled” only reveals some of the processing performed on a coil. It doesn’t narrow down the hundreds of grades at steel or aluminum mills.
Melt chemistry, rolling practice, annealing cycle as well as other processing steps such as coating or leveling all affect the forming and joining properties of sheetmetal grades. Be sure to use terms that your material supplier understands. Otherwise, you might not get what you want…or what you need.
Author: Daniel J. Schaeffler, Ph.D.
First published in the January 2018 issue of MetalForming Magazine
Even though both organizations are automotive-focused, FMEA and other quality tools should be applied to companies of all sizes and industries as an effective way to improve first-pass quality and reduce costs.
Dimensional variability. Random splits. Surface waves. Any or all of these can cause big production headaches. Scrambling to fix the problems can lead to a host of other issues. The best time to address problems is before they occur—an ounce of prevention as they say. But how do you know where to focus your up-front efforts? After all, we already are late with tooling buyoff and we need to ship the tools to the home line.
Failure Mode and Effects Analysis (FMEA)
FMEA, or failure modes and effects analysis, can help align your efforts with the issues that can cause the most problems. FMEAs are created before production and rely on your experience with similar parts. Rather than only highlighting the consequences of failure, following this discipline helps prioritize the issues that represent the biggest risks to success.
Key to FMEAs is the risk priority number (RPN), which results from multiplying the numerical severity, likelihood of occurrence and likelihood of detection ratings. Individually, these ratings can vary from 1 to 10. Failure modes with the highest RPNs must be attacked up front. Otherwise, you most likely will deal with them during production.
First, we must identify what we are trying to achieve. Many MetalForming readers seek to produce production quantities of dimensionally accurate, split-free stampings from the full range of acceptable tensile properties associated with the ordered sheet metal grade. Doing so requires many process steps. Raw-material receiving and storage, die setup, and stamping are just the high-level step. In conclusion, each of these can be broken down into smaller actions that can interfere with the end goal.
Failure Modes & Failure Effects
What can go wrong, and what happens when something goes wrong? Failures come in all degrees, with some more important than others. Here, we will not make judgments on the levels of importance or their frequency; instead, just focus on what could happen. Failure in this context includes any error or defect. A failure mode describes the way in which a failure occurs. A failure effect represents the immediate consequences of a failure on the operation, function, or functionality of some item.
Consider just one part of our overall goal: producing dimensionally accurate parts. In this step we define all the failure modes arising from incorrect dimensions that could block us from reaching our goal. Each failure mode can bring several failure effects. Some failure modes and effects associated with incorrect dimensions include issues such as those shown in Table 1. Why these failure modes occur and how to address the root causes will be the subject of a future article.

Severity–How Bad Is It?
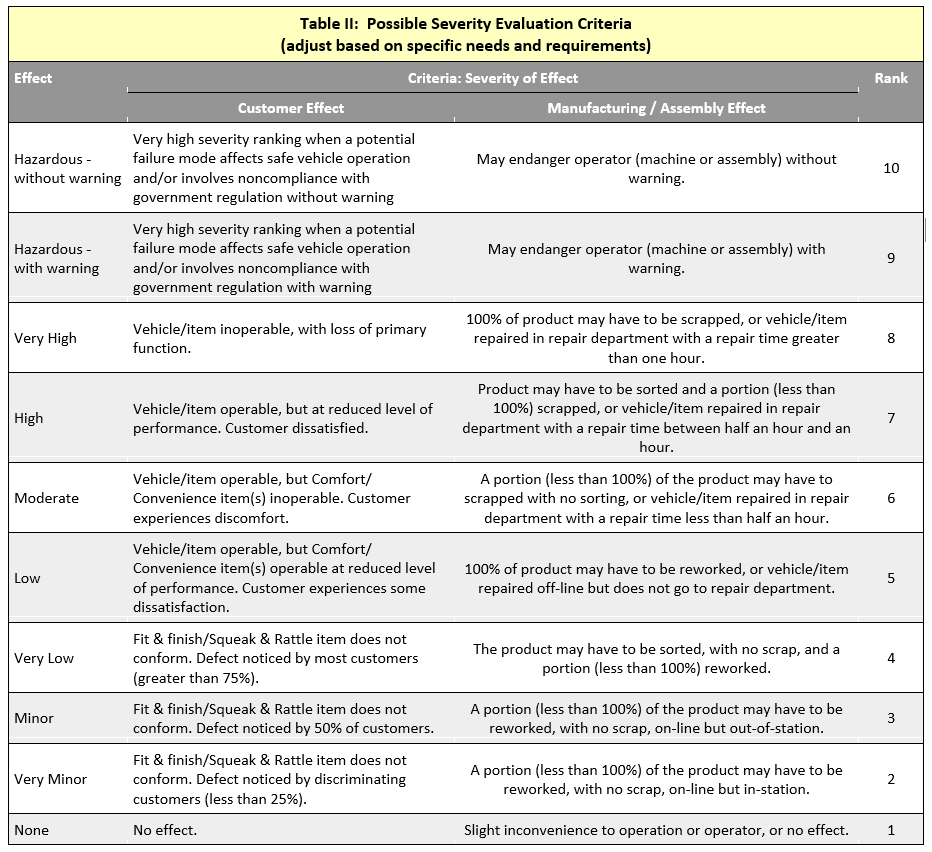
Severity assesses the seriousness of the effect should failure occur. The highest severity ratings are given to those instances where failure leads to violation of safety or regulatory requirements, with the highest rating of 10 given for a catastrophic no-warning event. Even if the effect has relatively low values of occurrence and detection, those with high severity ratings should be addressed due to their implications. Table 2 lists possible effects, their severity and their ratings. The actual thresholds should be customized for your specific needs and concerns.
Potential Causes or Mechanisms for Each Failure Mode
Each failure mode can have several causes. For example, using the wrong sheetmetal grade can have many causes. These include:
- Service center shipped the wrong product
- Purchasing ordered the wrong material grade
- Receiving placed the wrong label on the coil
- Operators pulled the wrong coil from inventory
- The forecast was incorrect, so the correct material was not available when production needed to make parts.
Occurrence—The Frequency of Each Failure Mode
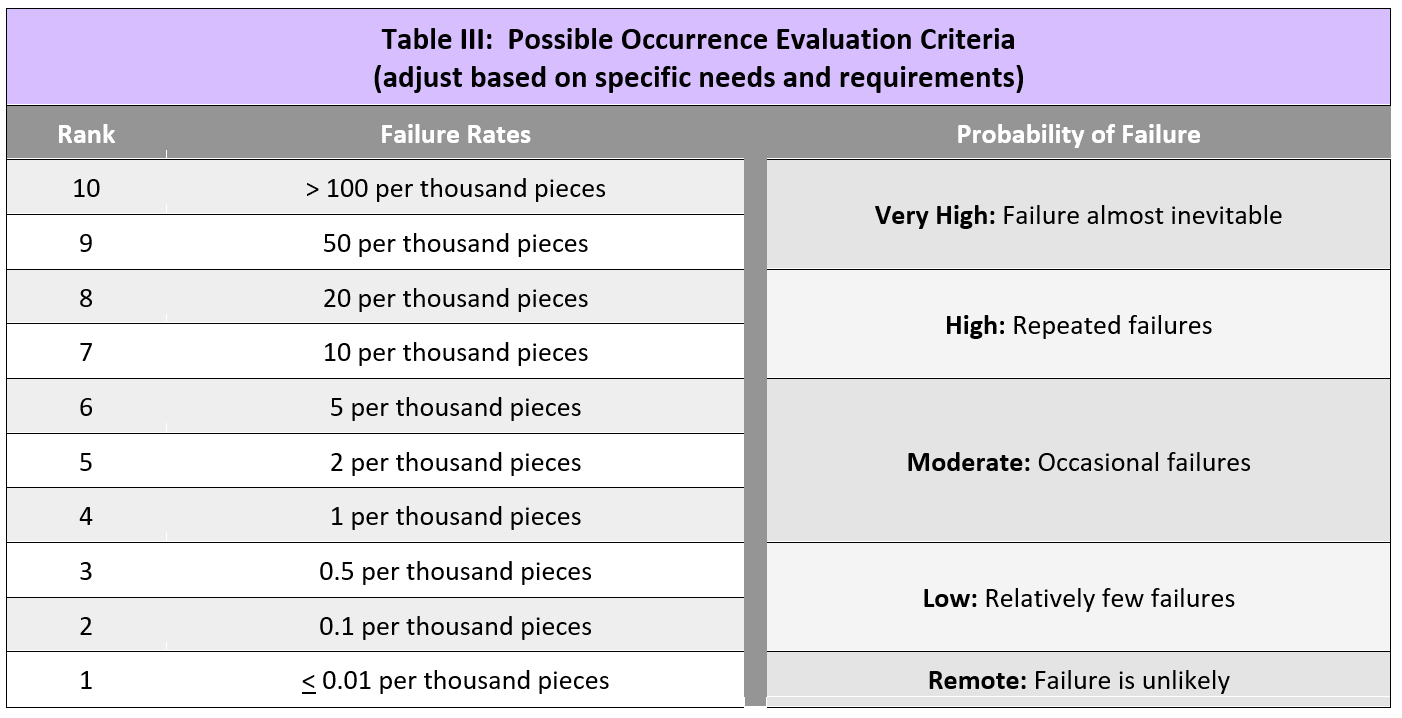
The assembled team should assign a ranking related to the likelihood that each of the potential causes will occur. A design or control change of potential causes represents the only way to change an occurrence rating. Table 3 lists possible failure rates and their ratings. As with severity ratings, the actual thresholds should be customized for your specific needs and concerns.
Detection Assesses Effectiveness of Design Controls
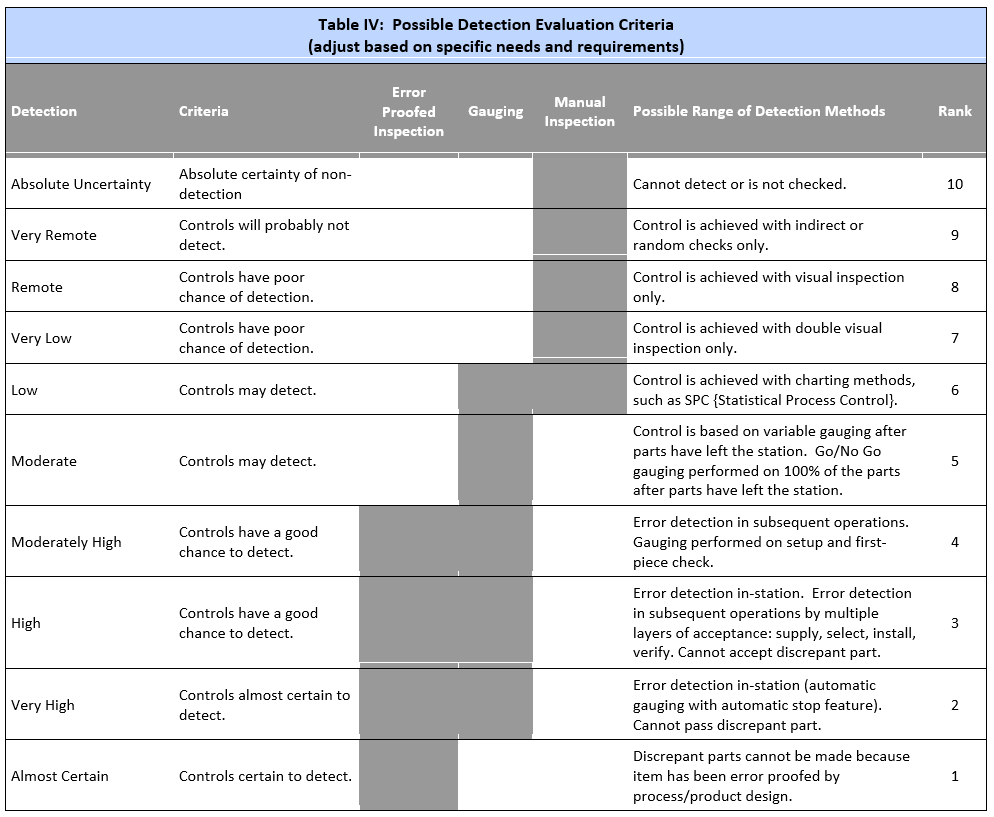
If it occurs, are we likely to catch it before damage is done? Detection assesses the effectiveness of each design control. For example, having two operators check the certified metal properties helps to confirm that the correct grade will be processed, but this assumes that paper being checked is correct. Barcodes are great for tracking inventory, but only if the barcode isn’t crossed out with a marker without a corrected number written next to it (yes, this did happen).
Table 4 lists possible detection criteria and their ratings. The actual criteria and ratings should be appropriate for your specific needs and concerns.
Prioritizing Risk
In order to generate the risk-prioritization number (RPN), multiply the severity (S), occurrence (O) and detection (D):
RPN = S * O * D
RPNs vary between 1 and 1000. The highest RPNs help to define action areas. These efforts might take the form of testing, documenting, tracking, changing design, changing process or changing material—or undertaking many other corrective actions.
Who’s on the FMEA Team?
Maybe you’re a process engineer who has worked in several roles over the years and is pretty familiar with the steps involved in making a good part. Although your instinct may be to build the FMEA yourself…don’t. Consider a general contractor who knows how to build a house, but still brings in specialists to handle the plumbing, electrical and drywall. Remember, you aren’t trying to lay out all the steps to be successful—you and your team are trying to document all of the ways that you may be unsuccessful. Get as many disciplines as possible involved: receiving, design, tooling, manufacturing, assembly, reliability, quality and shipping all can have an impact.
Helpful Resources for FMEA Development
SAE International and the Automotive Industry Action Group offer documents to guide metalformers through the development of FMEAs. Even though both organizations are automotive-focused, FMEA and other quality tools should be applied at companies of all sizes and industries as an effective way to improve first-pass quality and reduce costs.
Preparing to work on your first FMEA may appear to be a daunting task. Many things can go wrong, including some that you had not even considered beforehand. But that’s the point. Understanding the risk up front means not having to deal with it during production when you are more likely to apply Band-Aids and temporary fixes. After creating a few FMEAs, the process becomes much easier, and FMEAs will fit right into your standard part-development process.
To access additional knowledge on metal forming, please click here!
Author: Daniel J. Schaeffler, Ph.D.
First published in the December 2017 issue of MetalForming Magazine
Optimizing sheetmetal flow to form a stamped part requires understanding the interaction between the sheetmetal, surface characteristics and tooling. Consider where we were in the 1970s. Back then, we could choose between seven grades of sheet steel. Most of the steel used on cars did not contain a galvanized coating. Lubrication for many deep-drawn parts consisted of a paste made from animal fat. And the tooling material choices for large stampings? With apologies to Henry Ford, you can have any material you want, as long as it’s D2. If the surface wasn’t up to the desired quality, there was always Bondo and a few more layers of paint. Using just trial-and-error could produce a good part, given that there were a limited number of variables to master and that a threshold for “sufficient quality” took less effort.
This sounds like ancient history. But is it? Almost half of all tool-and-die workers today are more than 55 years old. When they entered the field in the mid-1980s, they apprenticed under journeymen who learned the trade in the 1970s or earlier. Ideally, these workers now have 30 years of good experience. Unfortunately, some of them may very well have 1 year of experience 30 times over, repeating the lessons learned from their teachers.
Today’s metalforming industry looks quite a bit different than the simpler times of the 1970s.
We now can choose from more than 200 grades of sheet steel for automotive applications, ranging from one-half to 10 times the strength of the steels available four decades ago. Today, engineers can engineer properties of materials to meet the requirements of specific applications, moving away from commodity sheet metals. Zinc-coated steels for corrosion resistance are commonplace—with some automakers choosing soft pure zinc (either hot-dip galvanized or electrogalvanized) and others using a much harder zinc-iron alloy known as galvanneal. New aluminum alloys refined over the last decade are making significant inroads in more mass-market applications, with most suppliers bringing new capacity onstream.
Class A panels for exposed applications made from these steel or aluminum alloys must exhibit consistent surface quality such that just 100 microns of paint (half of that being clearcoat) is sufficient. The choice of tooling material, with coatings and inserts as necessary, is made based on the sheetmetal, intended application and part volume. Lubricants with additives are engineered based on the contact pressures and temperatures encountered during stamping. Productivity increases and the ability to stamp difficult to form grades help justify the purchase of new servo presses.
Basic Principles of Sheetmetal Forming
Even with these advances, basic principles still apply. Fundamentally, sheetmetal forming involves applying energy to a flat metallic piece to deform it into the desired shape. The energy to make stamped parts transfers from a punch, where the top surface features a contour that mirrors the targeted profile. That energy transfer is a function of how the workpiece responds to deformation, the path the sheetmetal follows in reaching that desired part shape, and the interfaces between the punch and sheet as well as between the sheet and the rest of the tooling. If the energy applied to the forming system to stamp a part surpasses the amount that the forming system can handle, a split will form in the part. When this occurs, either the energy requirements in part forming must be lowered or forming-system capability must be increased. This is where the interface interaction of lubrication, tooling surfaces and radii, and sheetmetal properties all come into play.
We must account for the variability inherent within the forming system. The specifications to which sheetmetals are ordered allow for a range of properties deemed to influence forming. A coil may measure more than a mile long, but we assume that mill certs taken on one sample from the coil end represent the entire batch. When we run a part and some of the stampings split, our first instinct may be to say that the sheetmetal changed, when in reality change occurred elsewhere in the forming system where we hadn’t measured—think of the unused tonnage monitors sitting in the corner of the plant. A better job of collecting meaningful information and analyzing the impact of these measurements on manufacturing results yields better anticipation and improved management of our processes, and, ultimately, greater efficiency and improved results.
Moving From Trial-and-Error To a Science and Engineering Approach
With so many variables present in today’s forming system, the metalforming industry must move from trial-and-error to a science and engineering approach. Experience remains vital, but we must recognize when to incorporate new information into the problem-solving process. The industry has made great progress via computer forming and structural simulation. The ease of use of these programs masks their complexity and caveats. But, deviations from reality can occur in many places, from a material model not matched to the sheetmetal grade, to the assumption that friction is uniform throughout the stamping. Furthermore, what metal properties should we add to the model? We must account for the full range of potential properties for a given grade.
Sometimes new information isn’t necessary. We can benefit from looking at what we already have, just from a new perspective. For almost 20 years, Dr. Stuart Keeler has shared his knowledge and experience with the readers of MetalForming and the Precision Metalforming Association’s conference attendees. He transformed the sheetmetal forming industry by enabling them to understand why the sheetmetal behaved predictably. He also showed them how to utilize this knowledge to produce a superior product, rather than just knowing how a part is formed. With Dr. Keeler’s retirement, I’m attempting to follow his path, and I can only hope to make a similar impact on our community. I look forward to sharing my perspective with you, and look forward to your comments, questions, critiques and criticisms.

